56. Building my Esquire
I’D decided to build myself an Esquire, rather than buying one. The baritone guitar had been my first attempt at finishing a body with a proprietary substance called Tru-Oil. It had been an experiment – a very successful one, which served to whet my appetite for more.
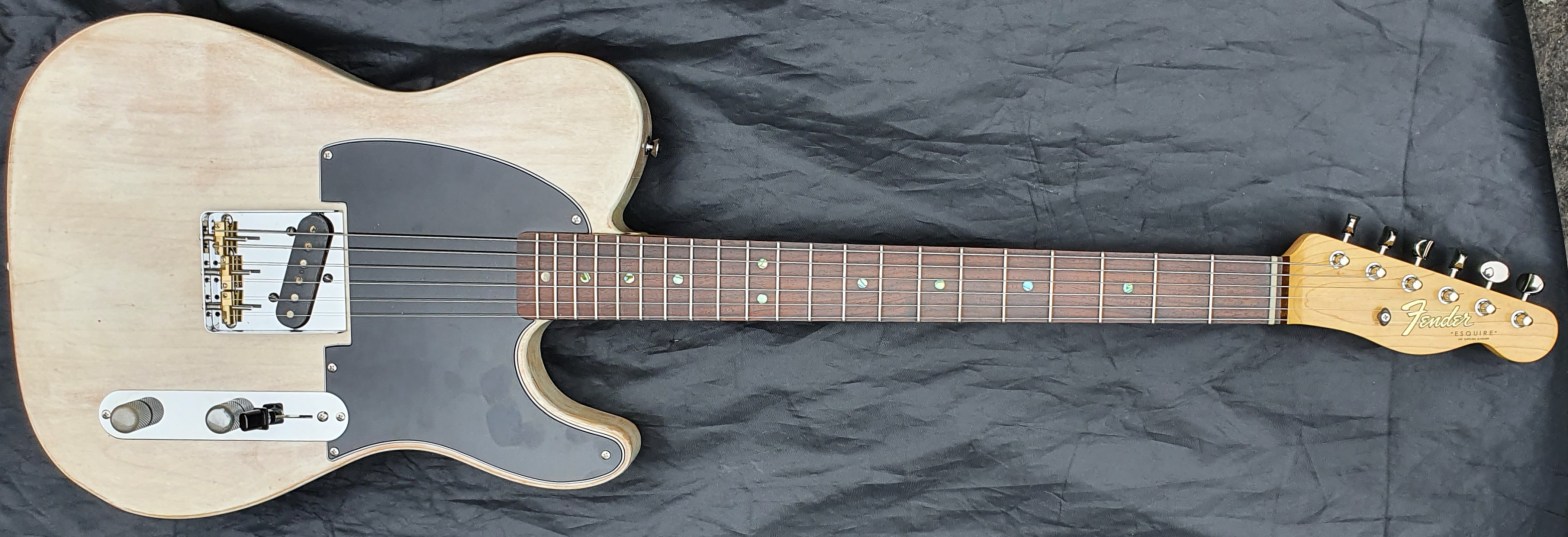
This time – again in the spirit of experimentation – I decided to try applying the Tru-Oil over a white stain, aiming for an approximation of the famous 50s Fender “white blonde” finish used on the “Mary Kay” Stratocasters made in 1957. It was a look I’d always liked, even if I wasn’t quite so keen on the gold hardware that usually went with it.

I decided to pair this 50s-inspired finish with a 1960s-style rosewood-board neck – for no other reason than that my three other Telecasters all had maple boards. I decided to continue the late 1960s vibe with a version of the Fender “transition” logo adopted after CBS bought out Fender in 1965. The larger, gold-edged Fender name (apparently intended to make the company brand more visible on TV) first appeared on Strats in 1965, but came late to the Esquire. It was only used between 1967 and 1969. None of my other guitars had such a logo, so I went for it. Extreme nerdiness, I know, but hey, only a guitar nerd would sit down and write 3,000-odd words about a guitar – or for that matter, take the time to read them, as you have done!
I had been super-impressed with the Telemaster body I used for the baritone guitar. Made by the British company, Guitarbuild, it was almost as stunning as the truly gorgeous figured Guitarbuild one-piece ash Strat body I bought a couple of years earlier but never used. Guitarbuild bodies are great quality, accurately cut from really good timbers and are highly recommended. Testament to the rigour of its quality control is the fact that Guitarbuild sells its factory rejects – bodies and necks where the router has slipped, something else has gone wrong, or a hidden defect in the wood has come to light – on a parallel website called Booboo Guitars.
Unlike their Guitarbuild counterparts, Booboo bodies aren’t nicely shaped and sanded, ready for finishing – evidently some are rejected at a much earlier stage in the production process than others, so still need quite a bit of sanding and filling. What they still are, though, is decent bits of wood – and very inexpensive!
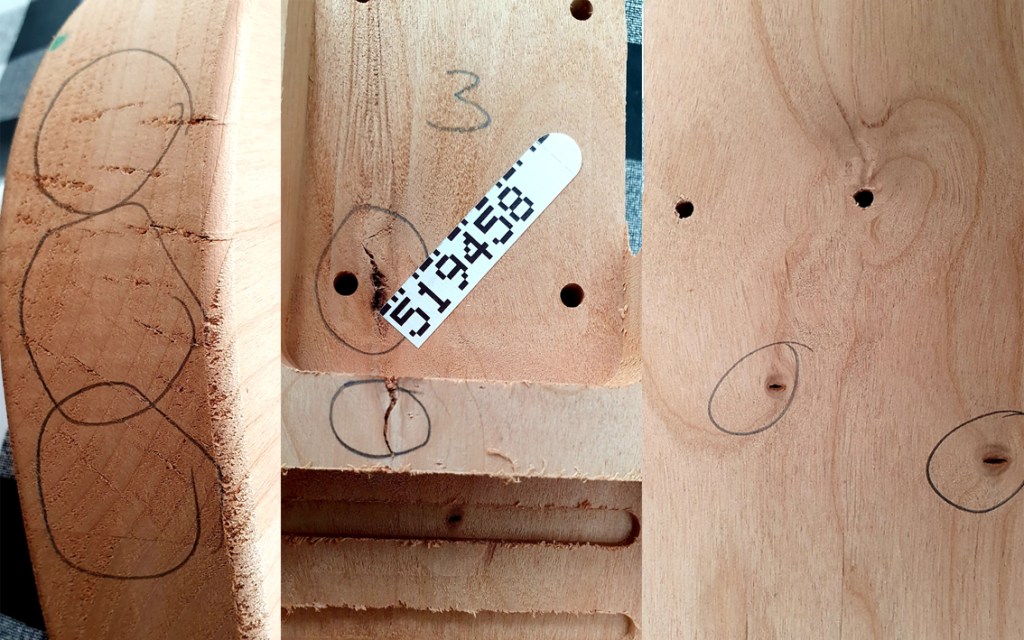
I found a lovely lightweight alder Tele body on the Booboo site that I thought would fit the bill. The only defects were a small natural crack in the wood of the neck pocket and a few tiny indented knots on the back. Oh, and the well for the output jack hadn’t been routed out. I gambled the neck pocket crack wasn’t structural (it was easily remedied with a bit of wood glue) and hit the “buy” button.
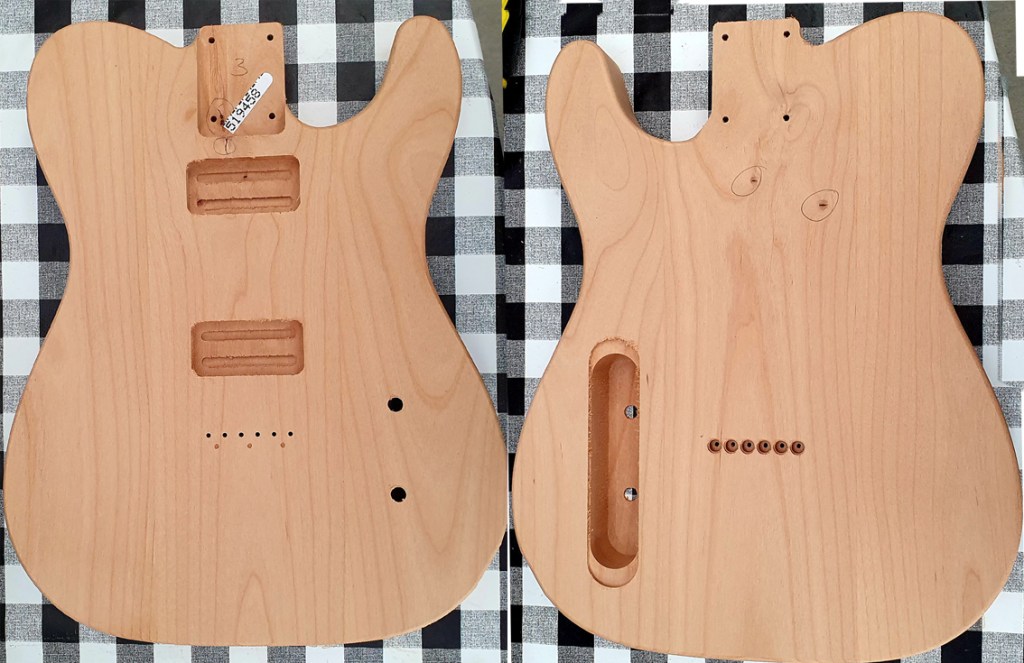
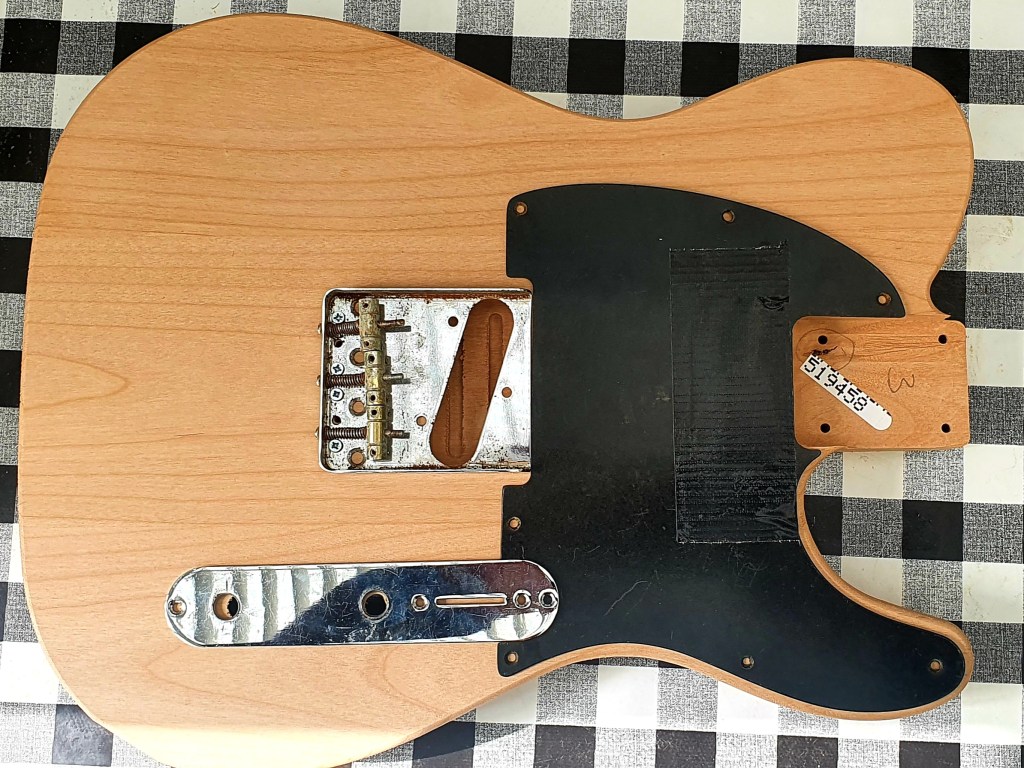
That was the good news. The not-so-good news was it wasn’t a standard Tele body. It was the right shape and the right thickness – quite a few aftermarket bodies aren’t – and the neck pocket was neatly routed to correct Fender dimensions. However, it was a “La Cabronita” body, routed to take two Gretsch humbuckers, a hardtail Strat bridge and a rear-mounted volume control – no tone control – and toggle pickup selector.
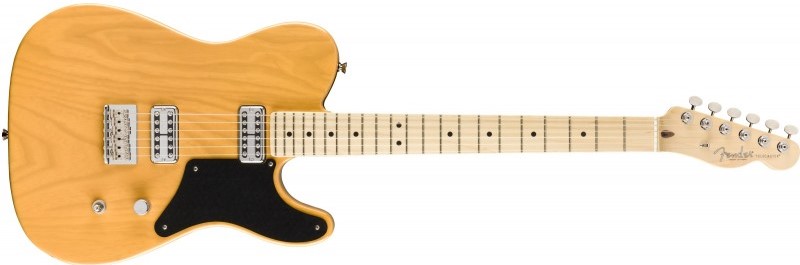
The Cabronita Tele has become a bit of a thing over the past few years. It originated in the Fender Custom Shop, where builder Mike Eldred (you’ll be hearing more about him later) started crafting upmarket one-off Teles that blended Fender and Gretsch characteristics (contrary to what you’ll read in some places Fender doesn’t actually own Gretsch, but it has a very close business relationship with the company). The result was a stripped-down hybrid, initially designed to appeal to the rockabilly market, but which has since achieved pretty wide acceptance. Billy Gibbons often plays guitars based on the Cabronita. (The name, I gather, is Spanish slang for “little bastard”, reflecting the hybrid nature of the guitar.)
My first thought was that none of this would present a problem. This was a nicely-figured, lightweight (less than 2kgs) and resonant bit of wood. The neck pickup rout would be hidden by the Esquire pickguard and the back-routed control cavity could be covered with a plate and, in case, would be out of sight on the back. I could still fit a Tele control plate on the front to make it look like an Esquire.
WRONG! As soon as I offered up a standard Tele bridge, pickguard and control plate, it was clear things didn’t quite line up! Evidently, the Cabronita was subtly different to a normal Tele. The control cavity sat about 10mm further back, the bridge pickup cavity was far too shallow for a Tele pickup, and the holes for the strings to thread through to the bridge a shade too further forward than on a normal Tele.
So the choice was to keep what was otherwise a very nice body, the perfect weight and adapt it – or sell it and buy a more standard Tele body. It was close, but the quality of the timber swung it. The clincher was when my Burnham friend Steve Edwards, a seriously skilled guitar-builder with a workshop full of the necessary gear, agreed to do some routing for me in exchange for a few tins of his favourite cider.
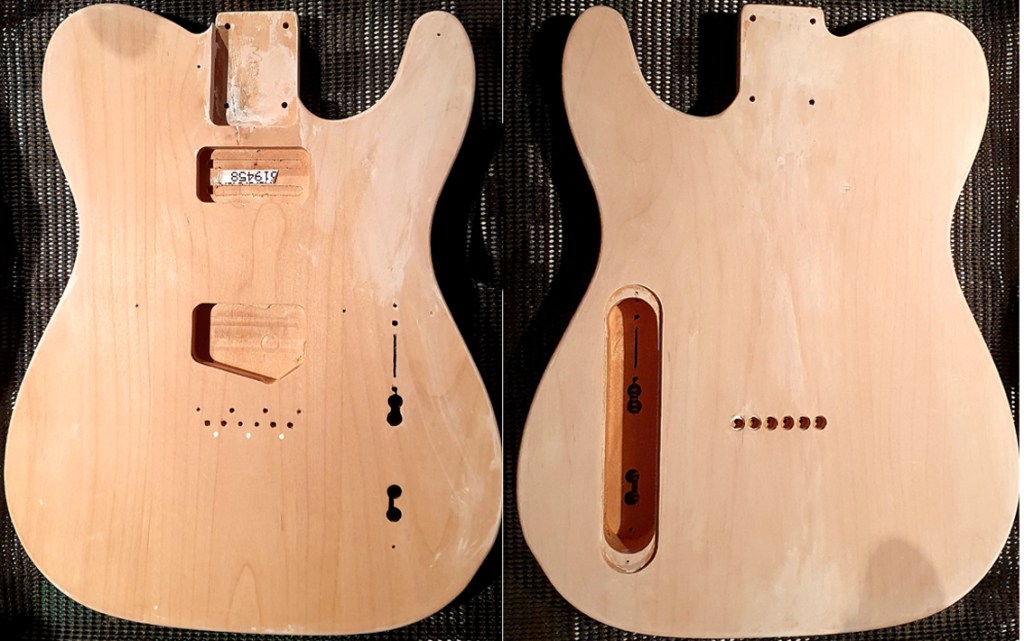
Steve did a grand job, extending the control cavity, routing out the bridge pickup cavity to take a Tele pickup and creating a well in the edge of the body for the output jack. Thanks Steve!
The bridge mounting holes were in the wrong place and lining the string holes up meant mounting the bridge about 5mm further forward, but I gambled on there being enough movement in the saddle screws to make the guitar intonate correctly. (There was – just – though I did also have to shave about 5mm off the back end of the pickguard to allow it to fit.)
A few dabs of wood filler took care of the old screw holes and those pesky little knots on the back. Once the glue in the neck pocket crack had dried, it was clearly was going nowhere!
As I mentioned earlier, the Booboo bodies need a lot more preparation than their Guitarbuild cousins. It took a few days of sanding before I was anything like happy. Even now, in certain lights, you can see that the finished guitar could probably have done with a bit more work, but that’s me…I’m an impatient guy!
My online researches suggested white acrylic paint (less than a tenner on Amazon) would be as good as anything to give me a whiter colour under the Tru-Oil. I very gingerly rubbed the paint into the body with a cloth, applying several layers, then rubbing them down with fine wet and dry paper and wire wool. I was aiming to lighten the wood’s natural sandy brown colour, but not completely obscure the grain. (It quickly dawned on me that Fender “white blonde” finishes were usually applied, not to alder, but to swamp ash, which is much more highly-figured, allowing the grain to show through strongly.)
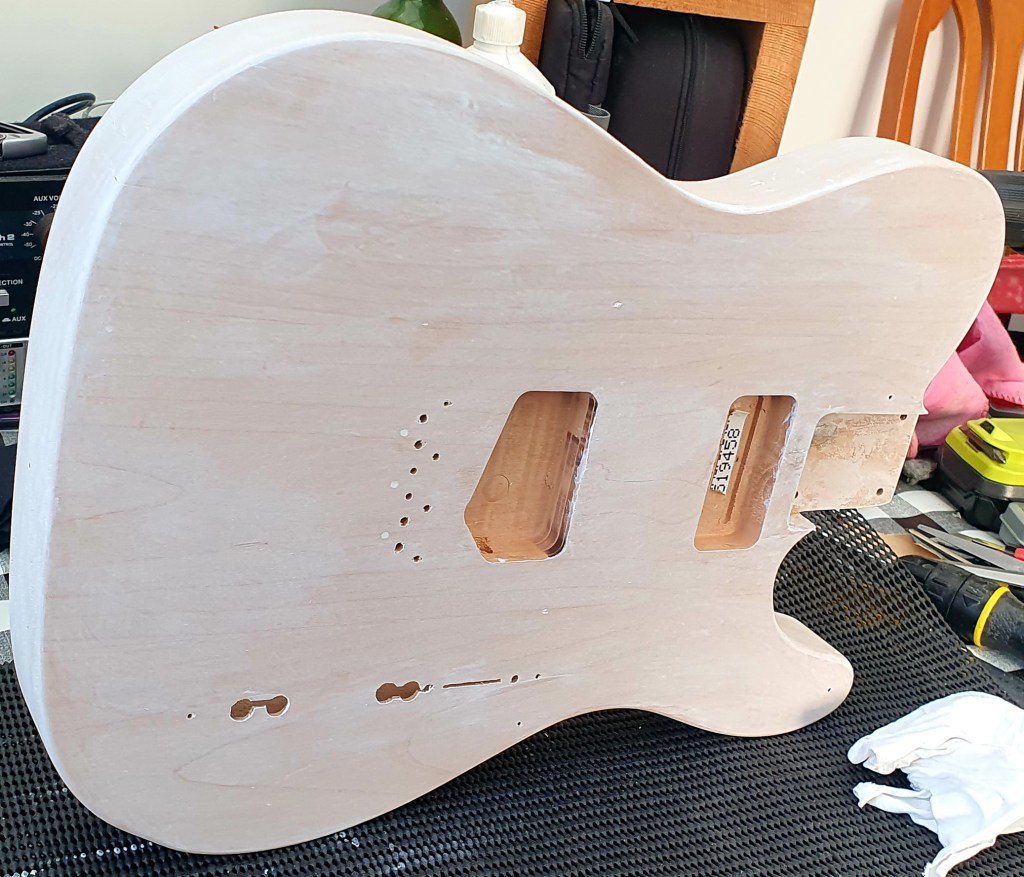
Even with an alder body, however, the result was pretty good – a tad streaky perhaps, with a bit more wood showing at the edges than I wanted – but it was ok for a first effort. I think the finished body, after the application of the obligatory 15 daily coats of the magic Tru-Oil looks rather interesting – a mildly-distressed take on Fender white blonde. (If I do another one, I’ll probably dilute the paint and brush it on thinly in layers, rather than rubbing it in.)


So, the neck. The received wisdom in some quarters is that you have to spend a lot of money to get a good, useable neck. However, my experience has been that you can find a perfectly good neck on eBay for less than £100. A couple of years ago, I found an absolutely beautiful secondhand Squier Cabronita neck on there for another project. (No 45 – the Slimcaster). It’s just a shame all the Squier Cabronita necks have maple boards!

I looked at a LOT of necks online before though, before shelling out the princely sum of £85 for a brand new one (doubtless Chinese). It was nicely made, a fair bit chunkier than my 52 AVRI, with a 9 ½” radius board, not the 7” vintage radius. It had the correct heel and headstock dimensions and arrived reasonably well fretted, with a well-seated, uncut plastic nut. There was a tiny defect in the finish near the heel, but that and a few sharp fret ends was all I could find wrong with it. The head was exactly the right shape (not always the case) and drilled to accept my favourite kind of tuners – I always feel Fender’s elegant Tele headstock doesn’t look right with anything other than vintage Kluson-style tuners.
A thorough fret polish and a generous application of lemon oil to the fingerboard (which may or may not be rosewood, but certainly looks right) and it came up a treat. Add that beautiful black and gold Fender transition logo, courtesy of my clever mate Glen, and a few thin coats of nitro sprayed on the face of the head to protect the decal and it was ready for the tuners. My number one choice for a guitar like this would have been the Kluson Deluxe lookalike versions from Wilkinson’s simple but effective Ez-Lok range. They have two holes drilled through them at right angles. You thread the string through one hole, then through the other, pull it tight and magically, the string locks pretty much solid. Sadly, reasons I can’t fathom, they’re impossible to find these days – and Lord knows, I’ve tried hard enough! You can buy all the other styles of Ez-Lok tuners, but for some reason, not the ones I wanted for my Esquire. If anyone knows why Wilkinson discontinued this particular model I’d love to know. I even wrote to Trevor Wilkinson about it, but never got a reply. Grrr!
In place of the Wilkos, I used a cheap set of Chinese Kaish-brand locking Kluson-style machines – the ones with a little wheel on the back which locks the string – on Wish. A few months earlier, on a whim, frustrated by not being able to find any Wilkinsons, I’d ordered a couple of sets from Wish on spec. Can anything that costs £18 a set – shipped all the way from the PRC – really be any good? Well, so far, so good…

The ferrules for the tuners were rather a tight fit, as they often are. I needed to use an old luthier’s trick I picked up on YouTube…heating up the steel with a soldering iron before pressing them in. It softens up the wood a bit and works a treat. (Works for string ferrules, too!)

I then cut the top nut for the strings, using razor saws, needle files and folded abrasive paper to create the necessary slots. It’s a process which, ideally, requires a more patience than I have – otherwise you can end up removing too much plastic or bone, making the slots too deep. On this occasion, I’m glad to say I managed to restrain myself and it turned out all right. Thinking about it, my impatience to get it done was probably tempered by the knowledge I wasn’t in too much of a hurry – the body was going to take a fortnight to finish, allowing for the daily coats of Tru-Oil to dry and harden!
The bridge was my favorite online store, Northwest Guitars’, take on Wilkinson’s compensated vintage-style Tele bridge – exactly the same thing and probably made in the same Chinese factory, but cheaper. My original choice of pickup was a supposedly high-output Broadcaster-style unit, hand-wound by a British company called Toltec. I was really excited to hear this pickup. It was beautifully made and came highly recommended by a few guys on the Facebook guitar forums. To be fair, it wasn’t all that expensive, but I was very disappointed when I finally put together the guitar, wired it in and plugged it in. It sounded rather thin and weedy-sounding. Not at all what I wanted.

Admittedly, I’d been spoiled for the last couple of years by a wonderful set of Seymour Duncan Custom Shop 53 taps I fitted to my beloved 1982 53 AVRI Tele. It was the first Fender six-string I ever bought and is now a veteran of 3,000-odd gigs (No 6 in this blog). They were very expensive American hand-wound pickups and has transformed my trusty old Tele from a good guitar to a truly great one. A tough act to follow… It took a bit of searching online and a LOT of asking around, but eventually, I found a chap on Facebook with a spare Duncan 53 tap bridge pickup he was prepared to sell me for sensible money. It was just what I needed.
The pickup was hooked up to a really nice pre-assembled Bloodstone Guitarworks custom wiring harness, with a tone-switching option known at the “Eldred mod”. The circuit was developed by the Fender Custom Shop’s Mike Eldred (remember, I mentioned him earlier?) to give the Esquire a third useable tone. The Eldred mod uses a three-way Tele switch to offer the two traditional Esquire tone options (bridge pickup with and without the tone control in circuit) plus a third, slightly honky tone that’s supposed to sound a bit like a cocked wah-wah pedal. It’s an interesting sound, certainly far more useable than the original bassy option Fender offered in the 1950s.

I could have figured out the circuit and made one up myself, but Bloodstone was offering a neatly-soldered, pre-assembled harness, made using premium components for not much more than I would have paid for the bits. I’d have been daft not to use it.

I screened the rear control cavity and the pickup route with self-adhesive copper foil – brilliant stuff, though if, like me, you cut your fingers on the sharp edges pushing it in you’ll probably swear as much as I did! I also used it to screen the smart backplate I cut from black plastic card.

Add a pair of strap buttons, a nice shiny control plate and few other finishing touches and there it was…another really nice guitar, and one of which I’m already immensely fond. It plays well, is beautifully light and resonant and looks pretty much the way I hoped it would.

More to the point, it sounds fantastic. Hit an open A chord and it rings forever…well almost. Proof positive that there is DEFINITELY something in all that scientific stuff I mentioned in part one.
So now…where can I get my hands on a Firebird Ihttps://43guitarsandcounting.com/2020/05/27/less-is-more-pt-3/?


One thought on “When Less is More Pt 2”